Here is the difference a bedding job can do for a 10 22.
Amazing bedding results!
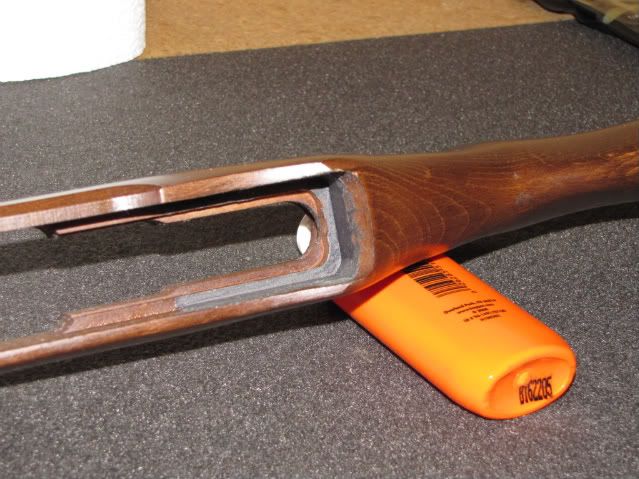
During my Christmas break I glass bedded my Ruger 10/22 DSP SS that I had bought used over a year ago. I have wanted to do this since I saw that there was a large gap around the sides of the receiver. After doing a lot of reading about it I finally ordered the materials and went and bought the brass hose fitting for the pillar post modification. I did that first and it was not hard at all, if you have access to a drill press and the correct size forstner drill bits, otherwise don’t even think about doing it. I took my time and taped everything up and then did the inlaying and then waxed everything multiple times. Finally I mixed up the epoxy and set everything in place and let it set up over night. It is a scary process, because you are still not sure that you are going to be able to get your barrel and receiver out of the epoxy and the stock. It took some work to get it out, but it finally came out. I put epoxy everywhere where the receiver and the barrel where making contact with the stock. I taped up the barrel so that I would end up with a barrel band of epoxy just behind the front of the fore end of the stock. I also put a double layer of tape around the take down screw area, so that I would be able to pull down the action to tune it. So in the end, there is pad around the barrel in the fore end of the stock of epoxy and then the bottom back end of the receiver where the bedding is actually holding the receiver in place. The take down screw then pulls down on the whole barrel and receiver downward. I had also ordered a hex head take down screw to use to be able to tune the rifle. I ground a grove on the long end of the Allen wrench, so that I could place the hook of a digital fish scale on the Allen wrench. This is my way of being able to measure the amount of pull on the Allen wrench. If I change the setting on the take down screw, I would loosen it completely and then pull it to back to the new measurement that I wanted. I started off with 1.6 lbs on the Allen wrench.
Well I was finally able to go to the range today and sight it in. I was using Federal Bulk ammo, just to get it on the paper. I was shooting from a wooden table on two sandbags at 25 yards. The first time that I shot a ten round group, I was amazed that I was on the paper and so close to the one inch black square that I was aiming at. (See #1 on 1.6 lbs target.) I shot a few more times and dialed in my tech sights. Then I changed over to some Winchester Super X ammo and cleaned the barrel with a bore snake and kept dialing in the Tech Sights. Then I switched to CCI ammo and cleaned it again and then changed the setting on the hex head take down screw to 2.0 lbs of pull using the digital fish scale and started shooting again. The first 10 shots, I thought that I had just gotten very lucky when the shots where all in the black one inch square. (See #1 on 2.0 lbs target.) I really did not believe what I was seeing. So I had to try again and the same thing happens again! Then I did it again! I was laughing out loud at this point and wondering if I was seeing things correctly in my spotting scope. So I walked down range to make sure that what I was seeing in the scope was really what was happening on the target and sure enough it was. I then went back and did it two more times. I am still so very happy with how things turned out.

Now I will have to go back to the range and see how I can do with my Appleseed Rifleman training and my improved rifle. Now that I KNOW that it is no longer the rifle that is off. You can look at the targets for yourself, if I can post them.
Hopefully this will help others to take the leap and bed their 10 22 along with the pillar post modification. So that you are albe to pull down on the pressure points, bottom back end of the reciever and the front pressure pad of the barrel, as they were designed to be. Hopefully I will post some more pictuces of the finished product soon.
Sighting in Ruger 10 22 - a set on Flickr